HTML5 Rich Media Creative
Connect with consumers through engaging digital campaigns
Asset Delivery Options
For client-produced HTML5 and/or rich media, assets should be:
- Developed and hosted by client and provided to Vericast account managers as ad tags (per the Digital Art Submission Guide specs page 3 footer callouts).
^^In cases where this is not possible, based on ad type, assets should be provided as next follows: - (If HTML5 (non-expanding; non-interstitial))—Assets to be developed by client team per Google ad technical specifications here » and provided to us as local .zip assets of the HTML5 banners for Google Campaign Manager 360/DCM direct file import.
- (If Rich Media (expandable/interstitial))—Assets to be developed by client team per Google ad technical specifications, hosted on client’s Google Studio account and provided to Vericast campaign mangers’ Google Campaign Manager 360/DCM account via an “advertiser association” request sent to CampaignManagement@valassis.com, followed by subsequent publishing steps upon completion of association.
^^Rich media files cannot be imported directly into Google’s Campaign Manager 360/DCM, thus require the client to host on Google Studio and make an advertiser association to transfer creative to our GCM/DCM account. Expandable banners are treated as rich media which we cannot import directly into our account without this step.
Creative Features & Setup Requirements Support
Google provides documentation around HTML5/rich media development of ad creative running via their platform. Your developer may follow available documentation for any feature options planned to be included in their creative builds. Vericast is not responsible for improperly implemented features for client-produced HTML5 and rich media.
For your convenience, here are Google documentation links to frequently utilized features:
- Get started with Studio
- Build an HTML5 creative
- How to prepare HTML5 display assets for Campaign Manager 360
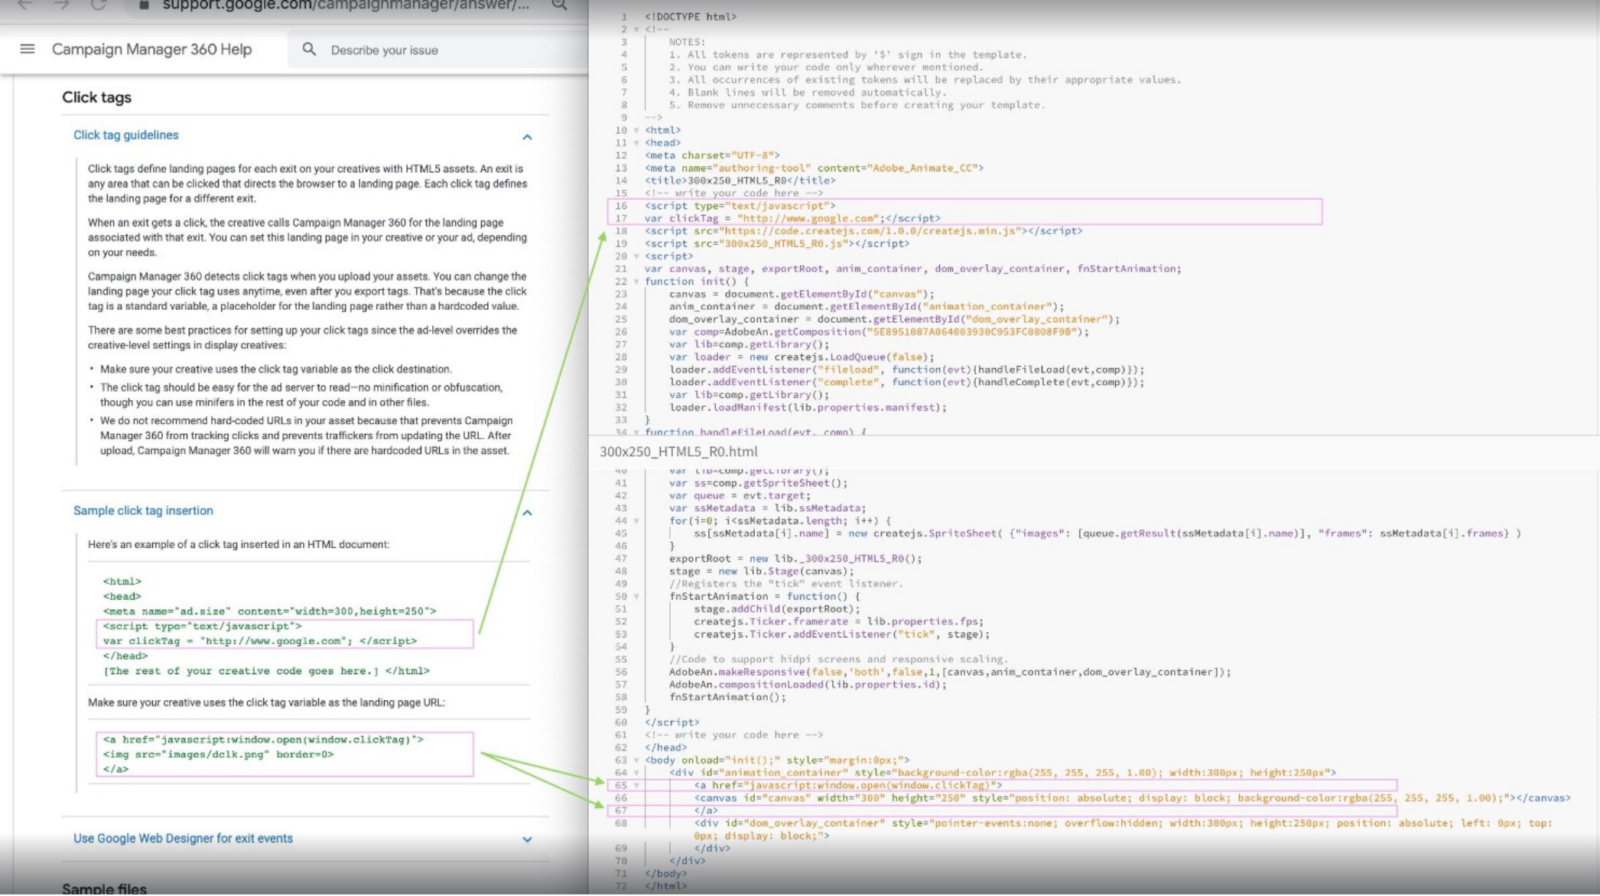
- clickTag Setup – Demonstrates how to include a click tag in HTML5 ad (non-Google Web Designer ads only).
- exitEvent Setup – Demonstrates how to include an exit event (such as with a metric ID of “exitEvent”) in Google Web Designer application (for Google Web Designer developed ads only).
- *Note that if Google Web Designer(GWD) app developed assets are supplied, they will alternatively require the following to successfully validate and import assets:
- The GWD ad environment must be configured to “Display & Video 360” which is described in documentation here.
- All clickable hotspots must be configured by the developer as GWD exit events (e.g., “exitEvent1”, “exitEvent2” metrics IDs) instead of as click tags which is described in documentation here.
- *Note that if Google Web Designer(GWD) app developed assets are supplied, they will alternatively require the following to successfully validate and import assets:
- HTML5 expanding creative overview
- Make an association / Publish creative to QA (required for rich media)
Additional Developer clickTag/exitEvent Support
Below are resources that can help your developers properly setup and test these files:
- Google HTML5 Validator – To verify clickTag or exitEvent setup is correct, upload your published .zip package containing image assets, JavaScript files, or other resources that are referenced from within the .html file.
*Note: A properly configured clickTag/exitEvent does not guarantee the hotspot (i.e., clickable target area) on the ad is also configured correctly (must test by clicking the creative preview for successful clickthrough). - Instructional Screenshot below (clickTag Variable Setup)
- Sample HTML5 Display File Package .zip
